Glass Cutting Advice
Cutters
A good cutter is one that does the job. There is a difference between brands. If you want a plain-steel cutter, buy a Fletcher, not a hardware store house-brand. Fletcher plain-steel-wheel cutters like 02’s, 07’s, 09’s and 096’s work well on all types of class. Carbide cutters, like the Toyo brand or the Fletcher CA-series have a smaller, harder cutting wheel and so is the amount of pressure required is about half of that required for the plain-steel kind. Carbide cutters cost more and last longer than plain-steel ones.
Keep your cutter lubricated. Use an old heavy container like a coffee mug to keep your cutter in. Dip it in between cuts. Put in 1/6th of an inch of Kerosene and a couple of disks of paper towels to prevent spills. We recommend using deodorized home lighting Kerosene (sold in many variety or hardware stores). The Toyo types contain the kerosene in the handle, saving the trip to the pot between cuts.
Don’t run a cutter past its prime. These types of cutter generally last for about a mile worth of scoreline. An old one requires excessive pressure and gives inconsistent results. One that has a flat spot on its wheel from being dropped on the floor will make an escape for a cutline every 3/4 inch or so. It’s false economy to ruin expensive glass with a worn cutter. If in doubt, get a new one.
Scoring The Glass
A good score-line is one you can hear clearly. It should sound like velcro fasteners being torn apart, or line a cotton bedsheet being ripped some distance from your ear. On some types of hard glass you will not necessarily see the line you have made, but you should be able to catch it with a fingernail. If you can see the line from two feet away, you are pressing too hard and will shorten the life of your cutter dramatically.
It is OK to start and finish a sixteenth of an inch in from the edge of a sheet. When cutting with a straight-edge bar or freehand-cutting a big sheet into smaller ones, you can pull the cutter toward you. On pattern cutting you generally push the cutter away from you. Keep these points in mind:
- After scoring, break the glass right away.
- Do not put a scored piece of glass back in stock. A forgotten score line can cause an unexpected (and dangerous) break.
- Do not go over a scoreline again.
- When cutting to a pattern, make your most difficult cut first.
- To remove a piece of glass from an inside curve, use a series of deeper and deeper crescent-shaped relief-cuts, breaking them out with your pliers.
Breaking the Glass
 Proper hand grip is important. Keep your fists tightly closed to protect the insides of your hands; your forefingers placed together under the scoreline act a fulcrums pushing up while your thumbs push down. “Tell it” where to break, by pushing up at the scoreline.
Tap with the cutter ball only when absolutely necessary, and do the minimum amount of tapping. Tapping almost always leads to dangerously sharp edges and extra grinding.
Ten common glass cutting mistakes
- Too little force. Can’t catch line with fingernail
- Too high a workbench for your height. Leads to mistake above.
- Too much force. White line looks like granulated sugar.
- No lubrication.
- Going over a line more than once.
- Failure to concentrate breaking force right at the score line.
- Too much tapping.
- Pattern laid out too close to the existing sheet edge. Stay 1/2 inch away.
- Cutting glass too close to rounded melt-edge. High stress concentrations here.
- Cutting flashed antique glass on the flashed side. Always cut from the base side.
Relative Difficulty of Cutting for Different Types of Glass

Glass Cutting 1.02
(A few more bits of advice from Ribbecke Studios)
- The right height of workbench is critical, and the bench should suit your height and body type. Too low a bench will give you a backache from too much bending over; too high will result in your not being able to get enough weight on the cutter. Experiment until you get it right.
- Push the cutter for curved cuts and pattern work; pull the cutter when using a straight-edge bar or a T-square.
- In making long cuts on large pieces of glass, it may be helpful to use a little two or three inch high platform step to increase your effective height relative to the bench. This is especially helpful when you have to lean very far in to make the cut. You can push it under the bench when it’s not needed.
- For cutting large pieces of glass, a carpet or a thick layer of paper will cushion the glass and help to even out any warps or bumps that might be present in the glass. For small pieces of glass, use a hard surface like bare wood. Too much softness on the cutting surface may cause the glass to dip as pressure from the cutter is applied, or to flip over.
- When making curved cuts with a paper pattern or with a line marked on the glass, use both hands on the cutter. Do not tie up one hand holding the glass down, it’s not necessary. If the cutter is working right, the wheel will roll freely and will not generate any force acting to move the glass. Trust it to stay in place due to its friction with the table.
- In pattern work, use both hands on the cutter, one to steer, one to steady the other and to help apply pressure. Keep the upper part of your body (shoulder, shoulder, hands) in a rigid triangle as if you were running a rototiller or shooting a pistol and walk through the cut. The whole triangle moves together; fingers and wrists should not move!
- Cutting with a straight-edge bar is trickier than freehand cutting. The side pressure you generate by holding the cutter against the bar can move the bar. To hold the bar still, spread out the hand holding the bar to give the widest possible two-point stance, thumb in one place and fingers as far away as possible, both pressing down equally. When making a long straight-edge cut, pull the cutter towards you while walking your hand spider-wise along the bar, staying opposite the cutter. You may pause the cutter in place (but don’t let it move) while your fingers take the place of the thumb and thumb moves to a new position. Applying a little extra squirt of kerosene at the beginning point of the cut line will often help quite a bit.
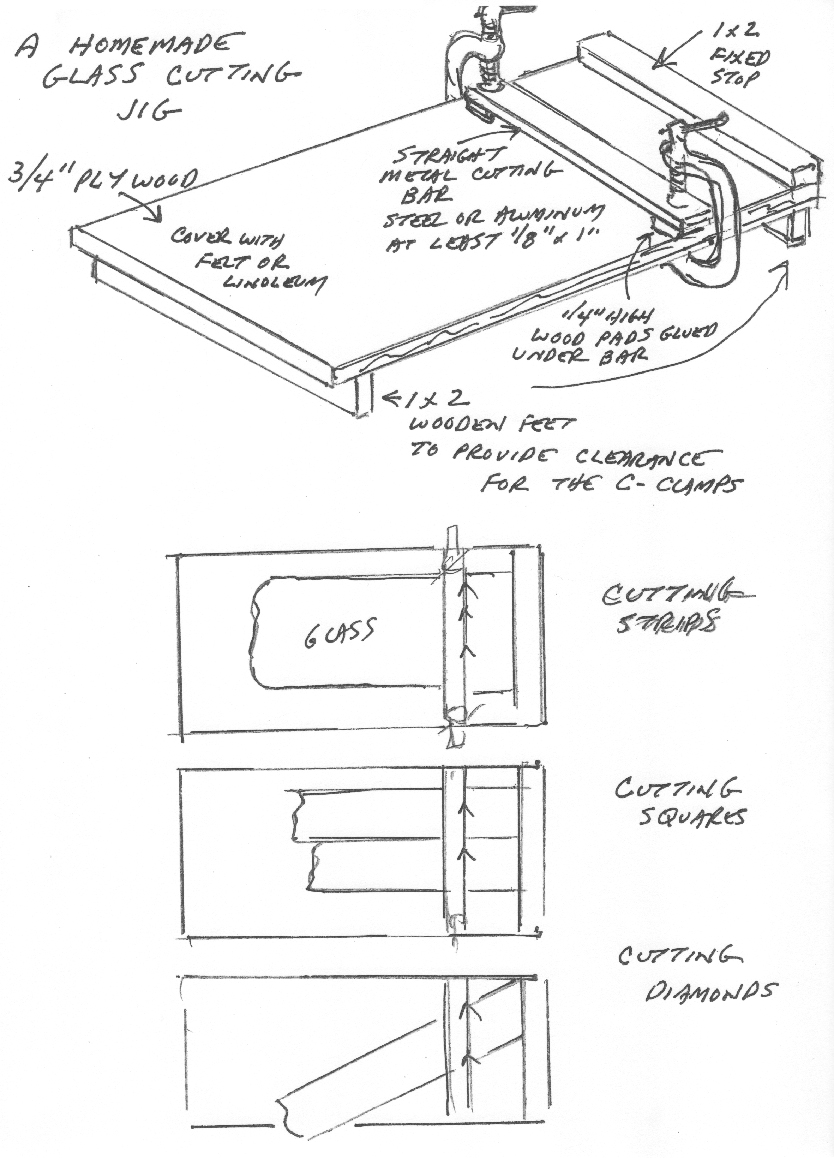
- A simple jig can be homemade for cutting repeating shapes and sizes, and a plan for making one is attached.